Wednesday, December 13, 2017

Batch Name disappears after you customize the Journal Page

clip_image001

Batch name drop-down disappearing on the journal pages in NAV 2013 and NAV 2013 R2 is an old issue but this issue resurfaced again this week couple of times for a client, so I have decided to write a blog on it.

This is a known bug in NAV 2013  & NAV 2013 R2 and can be fixed easily by applying the latest platform hotfix but if you are not planning to apply the hotfix then below solution will fix the issue for you

In this example, let’s look at the whse. physical inventory journal page

After I have customized the page, the page will look like in the below fig, and there is no way to add the batch name back to the page and this issue is user specific.

clip_image002

In order to resolve this issue, you need to open the development environment and find the table 2000000075 (User Metadata) and 2000000080 (Page Data Personalization), and run those tables and filter for the page no. . In this case I have filtered the Page ID column  (Whse. Phys. Inventory Journal Page is) to 7326 and the User ID column to my user ID.

Once you find that record, please delete that record from the table and perform the same steps in Page Data Personalization table and use the Object ID column instead of Page ID.

clip_image003

Compile the page and the batch name should appear on the journal page.

If you have any other tips or suggestions, please do share them in the comments below.

Share:

Tuesday, December 12, 2017

New COMPANYPROPERTY function in NAV 2018

notebook-2173630_1920

One of the new functions which were introduced in NAV2018 is COMPANYPROPERTY which has two properties

DISPLAYNAME: Which will return the display name from the company record

URLNAME: Which will return the name in the URL Format.

You can setup the Display Name on the company page as shown in the below figure:

clip_image002

As per Microsoft documentation, the change of display name now has immediate effect on reports as well as displaying the company name in the UI of the client

I have tried to the change the Display Name for testing but the change is not reflected on the RTC client, it did reflect in reports and in the web client. It would be nice if the same change is reflected in the RTC client when the System Indicator Company is used.

clip_image004

clip_image006

The URLNAME function returns the following output

clip_image008

One issue I have noticed is if we go to the company information card and make any change to the system indicator the display name is reverted to the original company name.

If you have any other tips or suggestions, please do share them in the comments below.

Share:

Sunday, December 10, 2017

Using Placeholders in NAV Reports

financial-2860753_1920

Placeholders provide a method to customize the formatting and insert as an expression inside the textbox.

To add a placeholder, click inside the textbox, then right-click and select Create Placeholder as shown in the figure.

image

image

Modifying or removing a field in a standard report like Sales Order (10075) is a pain because all the textboxes show their expressions as <<Expr>>, as shown below. Trying to identify which textbox contains the field that you want to modify or remove could be tiring.

image


If we have used Placeholders inside the textbox then it will be much easier to identify them as Placeholders not only allows you to add expressions but also gives you the option to add Labels to it. The labels will appear on the report layout as shown below.

image

Microsoft does a good job in naming the textboxes so it is easy to identify them using the name, for example if I look at the same report in Document Outline you can see how they named

The advantage with placeholder labels is you can view that in design mode.

image

Placeholders also have the ability to format the text differently. You can add more than one Placeholder in a textbox. Similar to Textboxes, Placeholders also have many tabs as shown in the figure below, which will allow you to format and customize text accordingly.

You can add more than one placeholder in a single text box and format each placeholder differently.


One other advantage of Placeholder is, it has the option to Interpret HTML tags. You can add configure your expression to render using HTML formatting. This allows us to add HTML tags directly into the expression, such as line break, font, bolding, underline….

For example, we can use the following expression in the Value field, and select the HTML option for Markup type in the above figure.

<font face="Arial"><b>T </b></font> ' + “Phone No." + '<br>'

If you have any other tips or suggestions, please do share them in the comments below.

Share:

Tuesday, December 5, 2017

December 2017 Cumulative Updates for NAV 2013, 2013 R2, 2015, 2016 and 2017

Here are links to the release notes and download link for the CU's released.

NAV 2013 – Cumulative Update 57

You can download the cumulative update from KB 4055888

NAV 2013 R2 – Cumulative Update 50

You can download the cumulative update from KB 4055889

NAV 2015 – Cumulative Update 38

You can download the cumulative update from KB 4055890

NAV 2016 – Cumulative Update 26

You can download the cumulative update from KB4055891

NAV 2017 – Cumulative Update 11

You can download the cumulative update from KB4055892

Share:

Connection refused error on NAV when connecting to web services

stamp-1726352_1920

When you try to access Navision Web services you may encounter the following error

This Site can’t be reached, xxxx refused to connect”

The most common reason for this error is the NAV Service is not enabled for SOAP/OData.

To enable these services, open the Microsoft Dynamics NAV Server Administration tool and select the SOAP Services Tab/ OData Services Tab  and make sure the property is set to true

Enable SOAP Services and Enable OData Services to true, if you are using SOAP you just need to enable SOAP and vice versa.

clip_image001

You can also use the Powershell Cmdlet

Set-NAVServerConfiugration to enable the services for example to enable OData you use the following cmdlet

Set-NAVServerConfiguration -ServerInstance <ServerInstance> -keyname ODataServicesEnabled -keyvalue true

Replace <ServerInstance> with the name of the Microsoft Dynamics NAV Server instance on which to set up OData services.

Check the following link for more examples

https://msdn.microsoft.com/en-us/library/dn135246(v=nav.70).aspx

One other reason for this error is because the port is blocked and you need to create an inbound rule to allow it.

Please check this below the article you need to do the same for the web services port

https://docs.microsoft.com/en-us/dynamics-nav/how-to--create-an-inbound-rule-in-windows-firewall-for-the-port-of-microsoft-dynamics-nav-web-client

If you have any other tips or suggestions, please do share them in the comments below.

Share:

New System and Hidden Tables in NAV 2018

window-1231894_1920

The following new system tables are added in NAV 2018

image

Two new hidden tables are added in NAV 2018

image

The new hidden table and new feature in NAV 2018 is API’s and when i run this table it listed the following API, in my next post I will see how can we can enable API on NAV 2018 and access one of those using the endpoint


image

If you have any other tips or suggestions , please do share them in the comments below.

Share:

Friday, December 1, 2017

Dynamics NAV 2018 is available to download

The much waited NAV version is now available to download, with lot of new features. Please download the software from the below link

https://mbs.microsoft.com/partnersource/global/deployment/downloads/product-releases/msdnav2018download

You can check what is new in NAV 2018 in this document

https://mbs.microsoft.com/Files/partner/NAV/Readiness_Training/ReadinessTrainingNews/WhatsNewDynamicsNAV2018.pdf

Some of the new features in this release are

Image Analyzer

Power BI reporting Control

Better OCR Integration

Preconfigured Excel Reports

Bulk Posting of orders, invoices and credit memos.

You can also change some servers settings in the new version without restarting the service.

You can have a different Company Name and Display name 

And Lots more

License Information

In order to run Microsoft Dynamics NAV 2018, you must have a valid Microsoft Dynamics NAV 2018 license file.  You will find more information about how to correctly license Microsoft Dynamics NAV 2018 in the license guide (partner-only).

Share:

Saturday, November 11, 2017

November 2017 Cumulative Updates for NAV 2013, 2013 R2, 2015, 2016 and 2017

Here are links to the release notes and download link for the CU's released.

NAV 2013 – Cumulative Update 56

You can download the cumulative update from KB 4052191

NAV 2013 R2 – Cumulative Update 49

You can download the cumulative update from KB 4052192

NAV 2015 – Cumulative Update 37

You can download the cumulative update from KB 4052193

NAV 2016 – Cumulative Update 25

You can download the cumulative update from KB 4052194

NAV 2017 – Cumulative Update 12

You can download the cumulative update from KB 4052195

Share:

Friday, October 20, 2017

Validate Email Address in NAV using RegEx

business-man-1002781_1920

Last week I was working on a shipment notification project where I need to send Email Notification of the shipment and one thing we need to check is the email address is valid or not. In Standard NAV the SMTP mail codeunit or Mail Management codeunit has a function to checkValidEmailAddress but it does a very basic validation and it did not meet our needs so I have written a new function to validate the email address.

I have used  RegEx( Regular Expression) and According to Wikipedia

“A regular expression, regex or regexp[1] (sometimes called a rational expression)[2][3] is, in theoretical computer science and formal language theory, a sequence of characters that define a search pattern. Usually this pattern is then used by string searching algorithms for "find" or "find and replace" operations on strings.”

Since we have the access the functions of RegEx function using DotNet, I went a ahead and wrote the following function to validate the email address using RegEx.

In our case we could store multiple email addresses in a field, so I have used String Array to parse and validate the email address.

PROCEDURE ValidateEmailAddresses@1000000008(EmailAddresses@1000000000 : Text);
     VAR
       RegEx@1000000004 : DotNet "'System, Version=2.0.0.0, Culture=neutral, PublicKeyToken=b77a5c561934e089'.System.Text.RegularExpressions.Regex";
       DotNetString@1000000003 : DotNet "'mscorlib, Version=4.0.0.0, Culture=neutral, PublicKeyToken=b77a5c561934e089'.System.String";
       EmailAddrArray@1000000002 : DotNet "'mscorlib, Version=4.0.0.0, Culture=neutral, PublicKeyToken=b77a5c561934e089'.System.Array";
       Convert@1000000001 : DotNet "'mscorlib, Version=4.0.0.0, Culture=neutral, PublicKeyToken=b77a5c561934e089'.System.Convert";
       I@1000000005 : Integer;
       EmailAddress@1000000006 : Text;
     BEGIN
       EmailAddresses := CONVERTSTR(EmailAddresses,',',';');
       EmailAddresses := DELCHR(EmailAddresses,'<>');
       EmailAddrArray := RegEx.Split(EmailAddresses,';');
       FOR I := 1 TO EmailAddrArray.GetLength(0) DO BEGIN
         EmailAddress := EmailAddrArray.GetValue(I-1);
         IF NOT RegEx.IsMatch
               (EmailAddress,'^[\w!#$%&*+\-/=?\^_`{|}~]+(\.[\w!#$%&*+\-/=?\^_`{|}~]+)*@((([\-\w]+\.)+[a-zA-Z]{2,4})|(([0-9]{1,3}\.){3}[0-9]{1,3}))$') THEN
           ERROR(Text106);
       END;
     END;
I got the above email address regular expression pattern from the below link, so please visit the below to know what validation it does.
https://www.rhyous.com/2010/06/15/regular-expressions-in-cincluding-a-new-comprehensive-email-pattern/

If you have any other tips or suggestions , please do share them in the comments below.


Share:

Wednesday, October 18, 2017

How to Schedule NAV Services to Restart

clock-2174116_1920

Recently I was asked if there is a way to schedule a NAV service to restart at a specific time, and for that I have used a small PowerShell script which I have scheduled using windows task scheduler.

Below is the script and steps for that

This example is based on NAV 2013 but the same code can be used for other versions

The below  PowerShell script is used to restart NAV Services, since in our case there are more then one NAV instance on the server, I have used a for loop to find all the available/running instances and then filter those instances using like statement, in this case I am only restarting NAV Instances with the word “Test” in their name. You can replace this with any other word or remove that condition.

Import-Module 'C:\Program Files\Microsoft Dynamics NAV\70\Service\NavAdminTool.ps1' -WarningAction SilentlyContinue | Out-Null
$Instances = Get-NAVServerInstance
for ($i = 0; $i -le $Instances.Count - 1; $i++) {    
     if ($Instances[$i].State -eq 'Running' -And $Instances[$i].Name -like '*Test*') {       
         Restart-Service $Instances[$i].Name
         #Write-Output $Instances[$i].Name
     }
}

Save the above script in a file and store in a location then we need to create a Task Scheduler to execute the above script.

Create a new task using the option shown in Fig 1, then choose the name, and Trigger when you want to run, under the Actions tab choose Start a Program  (Fig 2) and for the program use Powerhsell.exe and specify the ExecutionPolicy ByPass and path for the script in arguments

image

Fig 1


image

Fig 2

image

Fig 3


This will create a task in windows scheduler to restart the services, you can also export the task as .xml and import into another server.

If you have any other tips or suggestions, please do share them in the comments below.

Share:

Saturday, October 7, 2017

October 2017 Cumulative Updates for NAV 2013, 2013 R2, 2015, 2016 and 2017

Here are links to the release notes and download link for the CU's released.

NAV 2013 – Cumulative Update 55

You can download the cumulative update from KB 4045667 

NAV 2013 R2 – Cumulative Update 48

You can download the cumulative update from KB 4045668

NAV 2015 – Cumulative Update 36

You can download the cumulative update from KB 4045669

NAV 2016 – Cumulative Update 24

You can download the cumulative update from KB4045670

NAV 2017 – Cumulative Update 11

You can download the cumulative update from KB4045671

Share:

Friday, September 29, 2017

MAPI is not working properly while sending email in NAV

Recently I have worked on a issue related to E-mail, and would like to share the solution which helped me to resolve the issue.

One user is are getting the following error “MAPI is not working properly. One way to get MAPI working is to install Microsoft Exchange” when they try to send the email. This is version NAV 2009 R2, and in this version one way to send a report by email is using, File –> Send –> Report by Email. as show in Fig 1.

When I have searched the web I have found articles/forums where it was suggested to unregister MAPI OCX Dll File and Register it again, I have performed those steps but still it did not help to resolve the issue.


image

Fig 1.

One thing I did notice on that workstation was even though Outlook 2013 was installed it was never setup/initialized, once I have setup an account on outlook and then try to send the report by Email it opened the Outlook Client with Report body.

So, please make sure there is a default MAPI email client installed and setup when you receive the above error and that resolved the issue in my case.

If you have any other tips or suggestions to resolve this error, please do share them in the comments below.

Share:

Friday, September 22, 2017

How to print a remote file from NAV

fax-1889061_1920

I have seen couple of times the requirement where we need to print a document from NAV which is not a report, it could be a marketing campaign letter, sales sheets or any other document.

Most of the time we upload these kind of documents on a website/remote site, so if we need print those documents with every invoice or any other statement, below is the function you can use from NAV.

In the below example I just took a random PDF URL from the web and used it for testing.

The key in this function is to download the document from the web using WebClient locally and then use the Process to print the document to the printer.

LOCAL PROCEDURE PrintRemoteFile@1240060002();
     VAR
       FileURL@1240060000 : Text;
       ProcessStartInfo@1240060001 : DotNet "'System, Version=4.0.0.0, Culture=neutral, PublicKeyToken=b77a5c561934e089'.System.Diagnostics.ProcessStartInfo";
       Process@1240060002 : DotNet "'System, Version=4.0.0.0, Culture=neutral, PublicKeyToken=b77a5c561934e089'.System.Diagnostics.Process";
       WebClient@1240060003 : DotNet "'System, Version=4.0.0.0, Culture=neutral, PublicKeyToken=b77a5c561934e089'.System.Net.WebClient";
       LocalFileName@1240060004 : Text;
     BEGIN
       FileURL := 'http://che.org.il/wp-content/uploads/2016/12/pdf-sample.pdf';
       ProcessStartInfo := ProcessStartInfo.ProcessStartInfo();
       WebClient := WebClient.WebClient();
       LocalFileName := 'C:\Temp\TempFile.pdf';
       WebClient.DownloadFile(FileURL,LocalFileName);
       ProcessStartInfo.FileName := LocalFileName;
       ProcessStartInfo.Verb := 'Print';
       ProcessStartInfo.CreateNoWindow := FALSE;
       Process := Process.Process;
       Process := Process.Start(ProcessStartInfo);
       MESSAGE('Document Printed');
     END;

If you have any other tips or suggestions to resolve this error, please do share them in the comments below.

Share:

Saturday, August 26, 2017

Could not load xp_ndo.dll Error while accessing Navision

On the other day, I have created a new NAV database (2009 R2) using the SQL backup and when I try to access the database using the NAV client the following error popped up


image


It is more common that we all come across this error some day or the other. There are several blogs demonstrating how to resolve this error. You can find one in the link below

https://blogs.msdn.microsoft.com/nav_developer/2008/11/05/basic-sql-creating-extended-stored-procedure-xp_ndo-dll/

But even after doing the setup I ran into the following


image


The reason behind it was that there exists two xp_ndo dll’s that are named xp_ndo and xp_ndo_x64. One should use xp_ndo_x64 for the 64 bit. So, I changed the reference in the stored procedure to xp_ndo_x64 but still encountered the same error. The solution is to always have the reference say xp_ndo. Therefore, I renamed xp_ndo to xp_ndo_x32 and xp_ndo_x64 to xp_ndo, and then I changed the reference in the stored procedure back to xp_ndo.

If you have any other tips or suggestions to resolve this error, please do share them in the comments below.

Share:

Tuesday, March 28, 2017

March 2017 - Dynamics NAV Cumulative Updates

Share:

Tuesday, March 7, 2017

Microsoft launched Visual Studio 2017 today

VS2017

Today Microsoft launched new Visual Studio 2017, the latest version of the company’s integrated development environment (IDE) and it is available for download at the below link

https://www.visualstudio.com/downloads/

It also released the preview version for MAC which can be downloaded in the below link

https://www.visualstudio.com/vs/visual-studio-mac/

Please check what’s new in Visual Studio 2017 at this below link

https://www.visualstudio.com/vs/whatsnew/

(Source: https://launch.visualstudio.com)

Share:

Friday, February 24, 2017

How to add endpoints on Azure VM for NAV

Virtual-machine

Endpoints allow services running on Windows Azure VM to be accessed remotely. If you create a Azure VM for NAV using one of the templates available on the Azure then all the following endpoints are added by default, which will allow you to access NAV remotely.

  • HTTP 80
  • HTTPS 443
  • Client 7046
  • Soap 7047
  • Odata 7048
  • Help 49000

When you deploy a VM in azure there are two deployment models Classic and ARM (Azure Resource Manager). I will not be discussing the difference between those two in this blog but what I want to discuss how to setup the endpoints in these two models.


In Classic model when you click on the VM,  as shown in the below fig 1, it has the option of Endpoints and when you click on it, on the right hand side it will show all the endpoints and an option to add any new end points.


image

  • Fig 1: Azure Classic

In ARM model to add the endpoint you need to follow the below steps, Click on the VM and then overview and then on the Resource Group as shown in the (Fig 2), it will open an overview for that resource group and in that window select NetSecurity (Network Security Group) (Fig 3), which will open the settings and one of the option is Inbound Security Rules (Fig 4), Click on the Inbound Security Rules which will show all the endpoints added and where you have the option to add additional endpoints. (Fig 5)

SNAGHTML70aa39

Fig 2: Step 1

SNAGHTML76db9c

Fig 3: Step 2

image

Fig 4: Step 3

image

Fig 5: (Step 4)

Do you have any other tips or suggestions? Please let me know in the comments below.

Share:

Wednesday, February 22, 2017

Keyboard Shortcuts for the New NAV Development Environment

keys-97875_1280

The following table provides an overview of some of the shortcut key combinations that you can use when you're working with Dynamics NAV in Visual Studio Code. For a complete overview, see Key Bindings for Visual Studio Code

Editing

Keyboard Shortcut

Action

Ctrl+Space

Look up suggestions for the current object

Ctrl+X

Cut

Ctrl+C

Copy

Ctrl+V

Paste

Ctrl+F2

Select all occurrences

F12

Go to definition

Alt+F12

Peek definition

Shift+F12

Show References

Ctrl+Shift+Space

Look up parameter hints

Ctrl+K Ctrl+C

Add line comment

Ctrl+K Ctrl+U

Remove line comment

Ctrl+Shift+P

Show All Commands

Errors

Keyboard Shortcut

Action

F8

Move to the next error or warning

Shift+F8

Move to the previous error or warning

Compile

Keyboard Shortcut

Action

Ctrl+Shift+B

Compile and build the solution

F5

Build and deploy


(Source: https://msdn.microsoft.com/en-us/dynamics-nav/newdev-keyboard-shortcuts)


Do you have any other shortcuts or suggestions? Please let me know in the comments below.

Share:

Friday, February 17, 2017

How to skip unlicensed objects when exporting as text in NAV

calculation-1889005_1920

One of the tools I often use to review the objects or for debugging is Prism (https://www.stati-cal.com/). It is a great productivity tool for NAV Developers and Architects which helps quickly and effortlessly to get an overview of C/AL code, modules and dependencies. There are a couple of options in the tool to import the objects, one of the option is to have the objects in a .txt format which I normally use.  One issue I often encounter when I export all the objects in .txt format is, our license does not have permission to export all the objects into text format this is because of some restrictions placed by the vendors on their add-on objects.

In this blog, I will discuss different ways to export the objects into text format and by skipping the objects which the license does not have permission.

Option 1:

Use Powershell command Export-NAVApplicationObject with an ExportTxtSkipUnlicensed option. My colleague William Warnke explained this cmdlet and other in his blog. Please read it.

The CmdLet uses the license is which is uploaded into the database, but if you change the license temporarily with change function it will not work, so the license should be uploaded to use this option.

Option 2:

Use the Edit –> Toggle Mark function on all the objects and then unmark the objects which you don’t have permission, but for this you need to know which objects you don’t have permission to export; otherwise you have to try to export all the objects and when you get an error for an object exclude that object in the next iteration and repeat this process, this is very time consuming and not efficient.

I think this is the only option for the older databases before NAV 2009.

Option 3:

This option works only for newer versions 2009 and above. Select all the objects and use the Lock Function to Lock all the objects, it will lock only those objects which you have permission to export into text format. Once you lock the objects filter the objects which are locked and export them into .txt.

(Thanks again to William Warnke for the tip)

Do you have any other tips or suggestions? Please let me know in the comments below.


Share:

Thursday, February 16, 2017

What's new in Power BI Desktop for January

We have an exciting release of Power BI Desktop this month. It includes several formatting features that have been top asks and new Quick Calcs for your measures. We also have several updates to data connectors and two new query editing options.

Desktop Download button

Here’s the complete list of February updates:

Report view

Analytics

Data connectivity

Query editing improvements

Other

For a summary of the major updates, you can watch the following video:

Report view

Word wrap on matrix row headers

Last month, we added word wrap for table headers, and this month we are extending that support to matrix row headers. You’ll see a word wrap toggle under the Row headers card. Once you turn word wrap on, the row headers will word wrap to fill the space they have.

Headers will start to truncate once the available space runs out. This means the lowest level of your row headers will not wrap. We will be improving this experience and adding word wrap to values and column headers in future updates.

Find more details about matrix row header word wrapping in the following video:

X- and Y-axis font size control

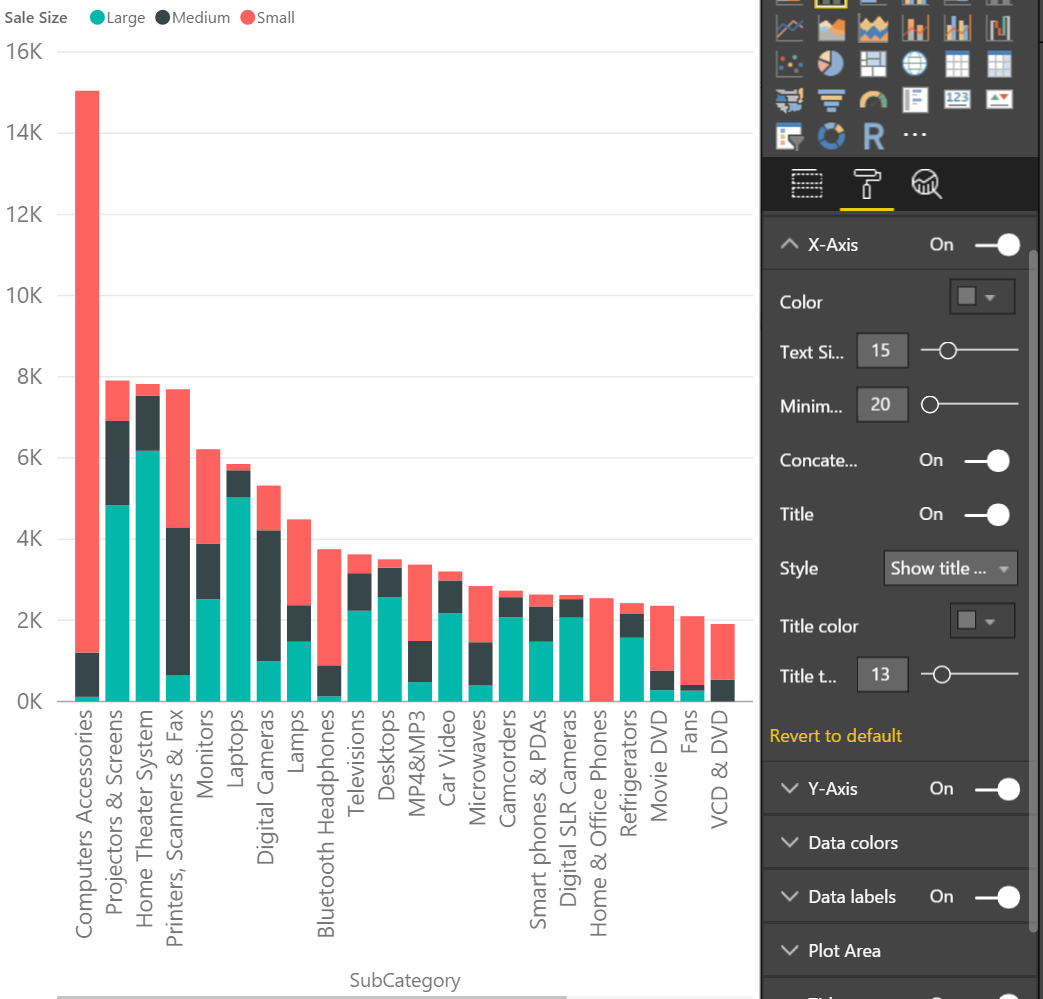
One of the most asked for formatting features we hear is the ability to change the font size for the X- and Y-axis, and with this release, you’ll now find the text size slider under the X-Axis and Y-Axis cards in the formatting pane. By default, the axis labels and title will change size together, but you can use the text size slider under the Title section of the axis card to override this and give the title a different size.

Find more details about the X- and Y-axis font size control in the following video:

Cartesian chart minimum category width

Depending on your data label settings and chart size, you may not see all the data labels on your chart. If you want to guarantee that your data labels show, you can now set the minimum width of categories in Cartesian charts. This is also a good feature to use if you are increasing the font size of the axis on your charts. You can increase your category width in conjunction with the font size to give the larger fonts more room on the axis. You'll find the setting under the X-axis card for column, line, and waterfall charts, and under the Y-axis for bar charts.

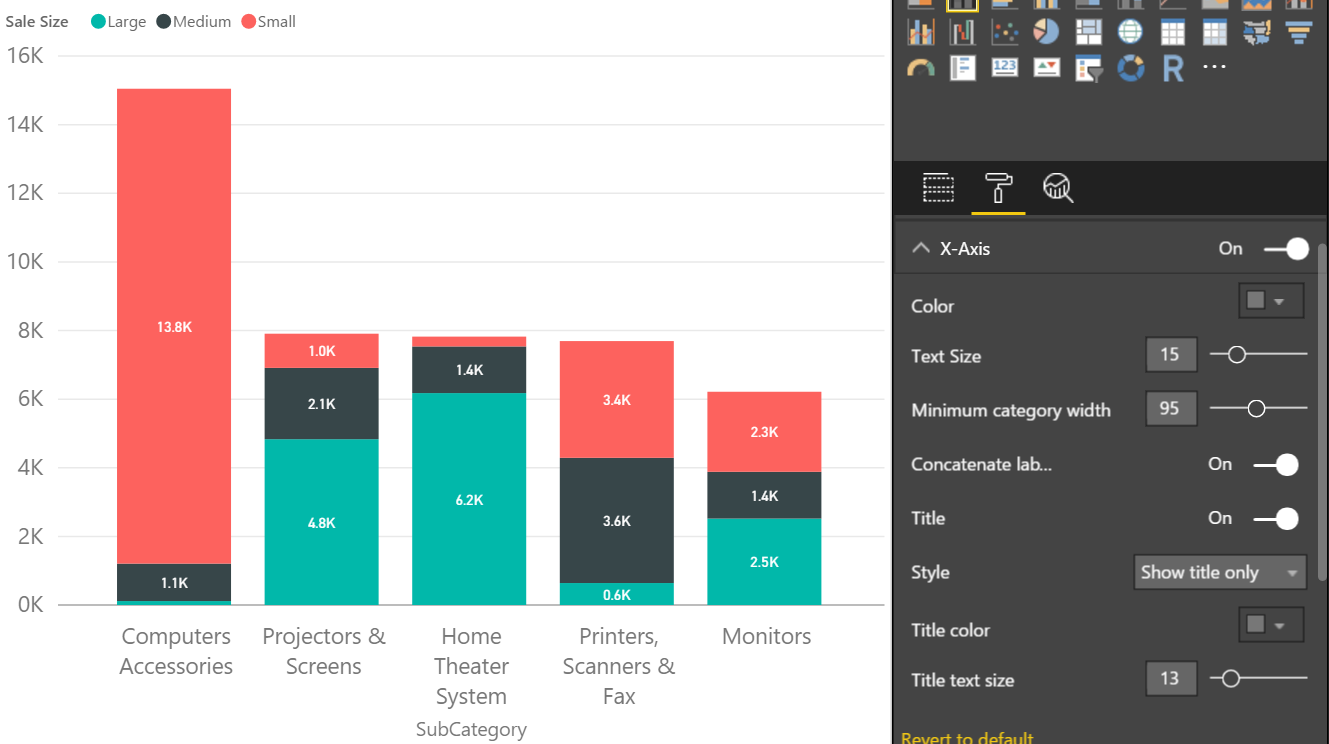
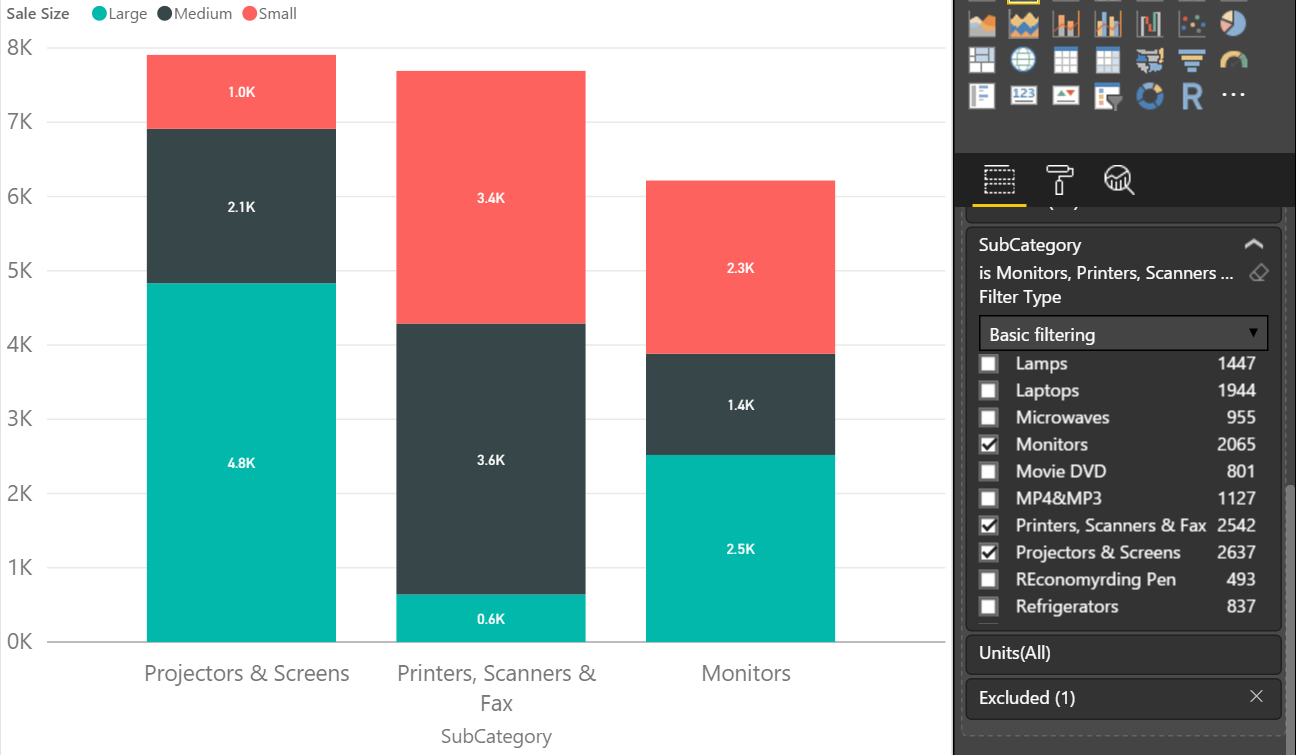
If you use this feature, we will always show the categories at least that wide. We will still use our auto-sizing logic to make the categories bigger than the minimum if wider categories will fit. This means you can set a minimum size that will guarantee your data labels will show, but if you start filtering data out, the chart will still auto-size the categories wider to look better.

Find more details about the Cartesian chart category width control in the following video:

Line chart line thickness and join type controls

With this release, we have a new formatting feature for line charts. Under the Shapes card in the formatting pane, you can use the stroke width feature to make your lines thicker. You can also control the join type. These features are great for both stylistic changes and readability.

clip_image012

Find more details about the Line thickness control in the following video:

Analytics

2 new Quick Calcs: Percent of row total & percent of column total

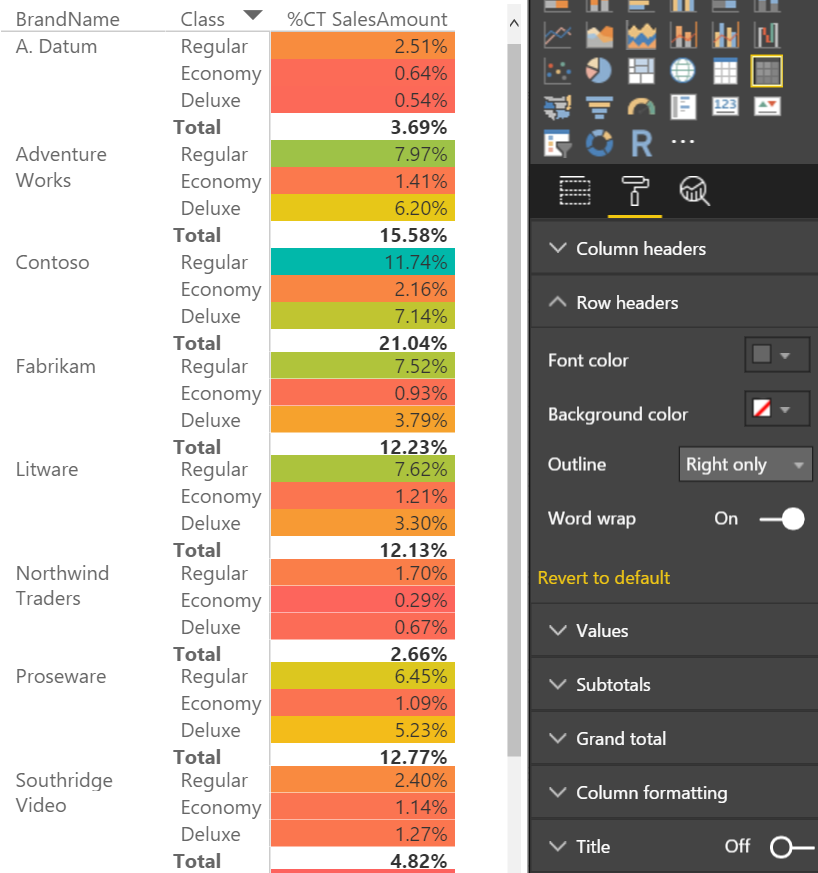
This month, we have two new Quick Calcs for values in the matrix visual. Now when you open the Quick Calc dialog for Value fields in the matrix visual, you’ll see need two new options.

clip_image014

Under Show value as, you’ll see Percent of column total and Percent of row total in addition to the Percent of grand total we released a while ago.

clip_image015

If you convert a matrix visual to another visual with one of these new Quick Calcs, the calculation will convert these totals into a percent of grand total.

More details about the new Quick Calcs can be found in the following video:

Data connectivity

ODBC and OLE DB connectors: support for selecting related tables

We have enabled the Select Related Tables button in the Navigator dialog when using the ODBC and OLE DB connectors. This option, which is available for other relational data sources already, allows you to easily select tables that are directly related to the set of already selected tables in the Navigator.

clip_image017

Find more details about this ODBC and OLE DB connectors update in the following video:

Enhanced Folder connector: support for combining binaries from the Preview dialog

In the November release, we shipped a set of enhancements to the Combine Binaries experience. You can learn more about those enhancements in this article.

This month, we’re making it easier for you to reach the Combine Binaries feature. You can choose to combine multiple files from the folder preview dialog within the Get Data flow, bypassing the Query Editor.

Note that we’re exposing multiple options (Combine, Combine & Load) to allow you to further refine your data before loading it into the data model.

Find more details about the folder connector improvement in the following video:

Unified text & CSV connectors

With this month’s release, we’re unifying the entry points for importing Text and CSV files into a single Text/CSV entry point. This new entry point can be found in the Get Data dialog, under the Files category.

clip_image019

Upon selecting this option, the Open File dialog allows you to select files with TXT, CSV, or PRN file extensions by default, or any other file extension by switching to the All Files (*.*) filter option.

Find more details about the unified text and CSV connectors in the following video:

PowerApps Common Data Service connector

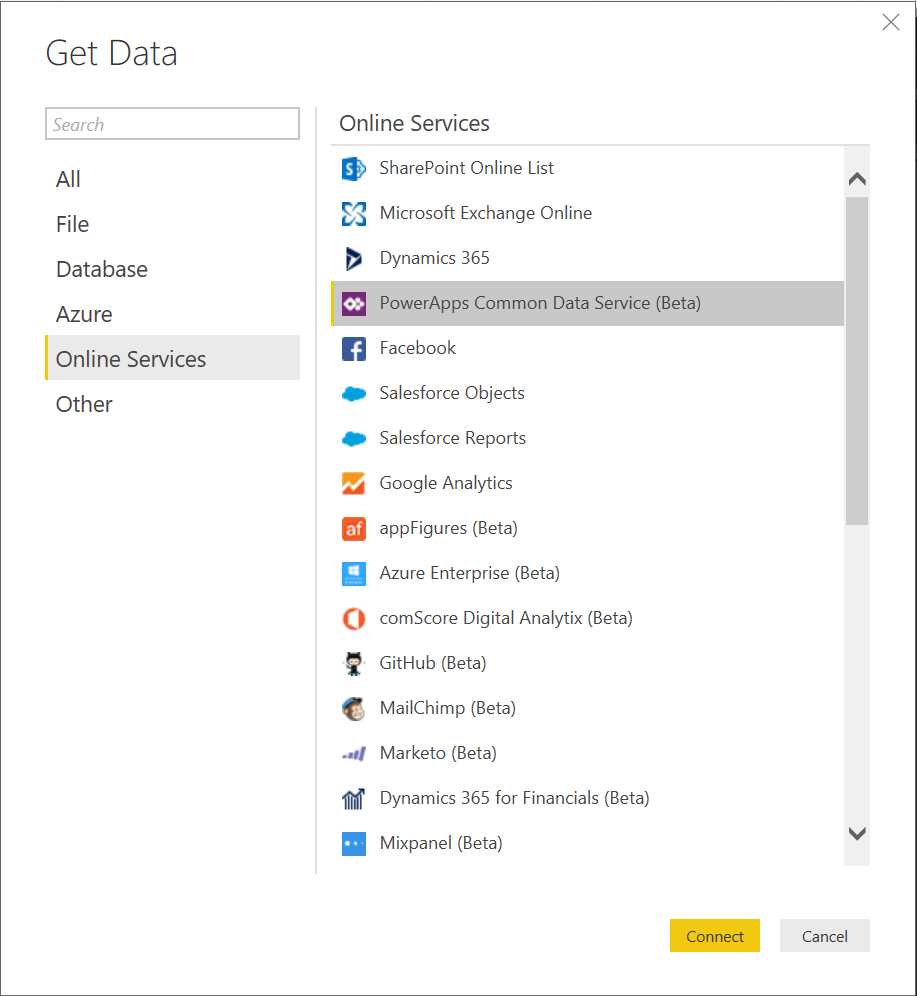
We are very excited to announce the PowerApps Common Data Service connector. You can now pull your Common Data Service data into Power BI and build reports to share with others.

Some of the great features that come with this connector include:

  • Near-real time data
  • Security roles defined in the Common Data Service
  • Auto-generated semantic models, which present data by subject area
  • Semantic models automatically updated when entities are extended in the Common Data Service

This connector can be found under the Online Services tab of the Get Data dialog box.

Once you select Connect, you'll be asked to sign in with your organizational account.

clip_image023

Once you sign in and select Connect, you'll be asked to choose the environment to connect to.

clip_image025

Next, select the perspective that contains the data you want.

clip_image027

We will now connect to the data and you can start building your reports to share.

clip_image029

The Common Data Service connector is currently in preview and only available to a segment of users in the United States. If you want to be part of the preview and aren't currently, you can request access by emailing: CDSPowerBIPreview(at)Service.Microsoft.com. In addition to being part of the preview group, to use this connector, you'll need to:

  • enable the Power BI integration in the PowerApps admin portal
  • have maker permissions in PowerApps
  • sign in to PowerApps at least once

If you want to learn more about the Common Data Service and the connector, check out the PowerApps blog or check out the Common Data Service and PowerApps documentation. As you try out this new connector, be sure to let us know if you have any questions or feedback!

Query editing improvements

Specify the desired column type and locale in column headers type menus

In the Query Editor, it's possible to see and modify column types by using the Type menus in the preview area. However, before this release, you couldn't change type by locale via these dropdown menus. This option allows you to specify the desired column type and locale to use for the conversion, which affects how text values are recognized as other data types (such as dates, numbers, etc.).

With this release, we’re adding Using Locale to the column header type menus for easier access to this capability, which has been a popular idea in our Power BI Feature Suggestions forum.

clip_image031

Find more details about the update to the column headers type menu in the following video:

Easily insert steps in existing queries

We’ve added a new context menu option to easily insert new steps in existing queries. Insert a new custom step after the currently selected step (which can be the final step or any previous step within the query).

clip_image033

Find more details about the update to the new steps pane option in the following video:

Other

Solution Templates and Partner Showcase quick access

We've added quick access on the ribbon to two great resources: Solution Templates and the Partner Showcase. Solution templates let you use a wizard to very quickly and easily create a working end-to-end enterprise-ready Power BI solution. The Partner Showcase lets you browse our certified partners, see their work, and reach out if you are interested in working with them. If you're looking for resources to work with when creating your Power BI solutions, be sure to check these out!

clip_image035

Find more details about the new resources in the following video:

That’s all for this month! We hope that you enjoy this new update and continue sending us valuable feedback about our product. Please don’t forget to vote for other features that you would like to see in the Power BI Desktop in the future.

Share: